
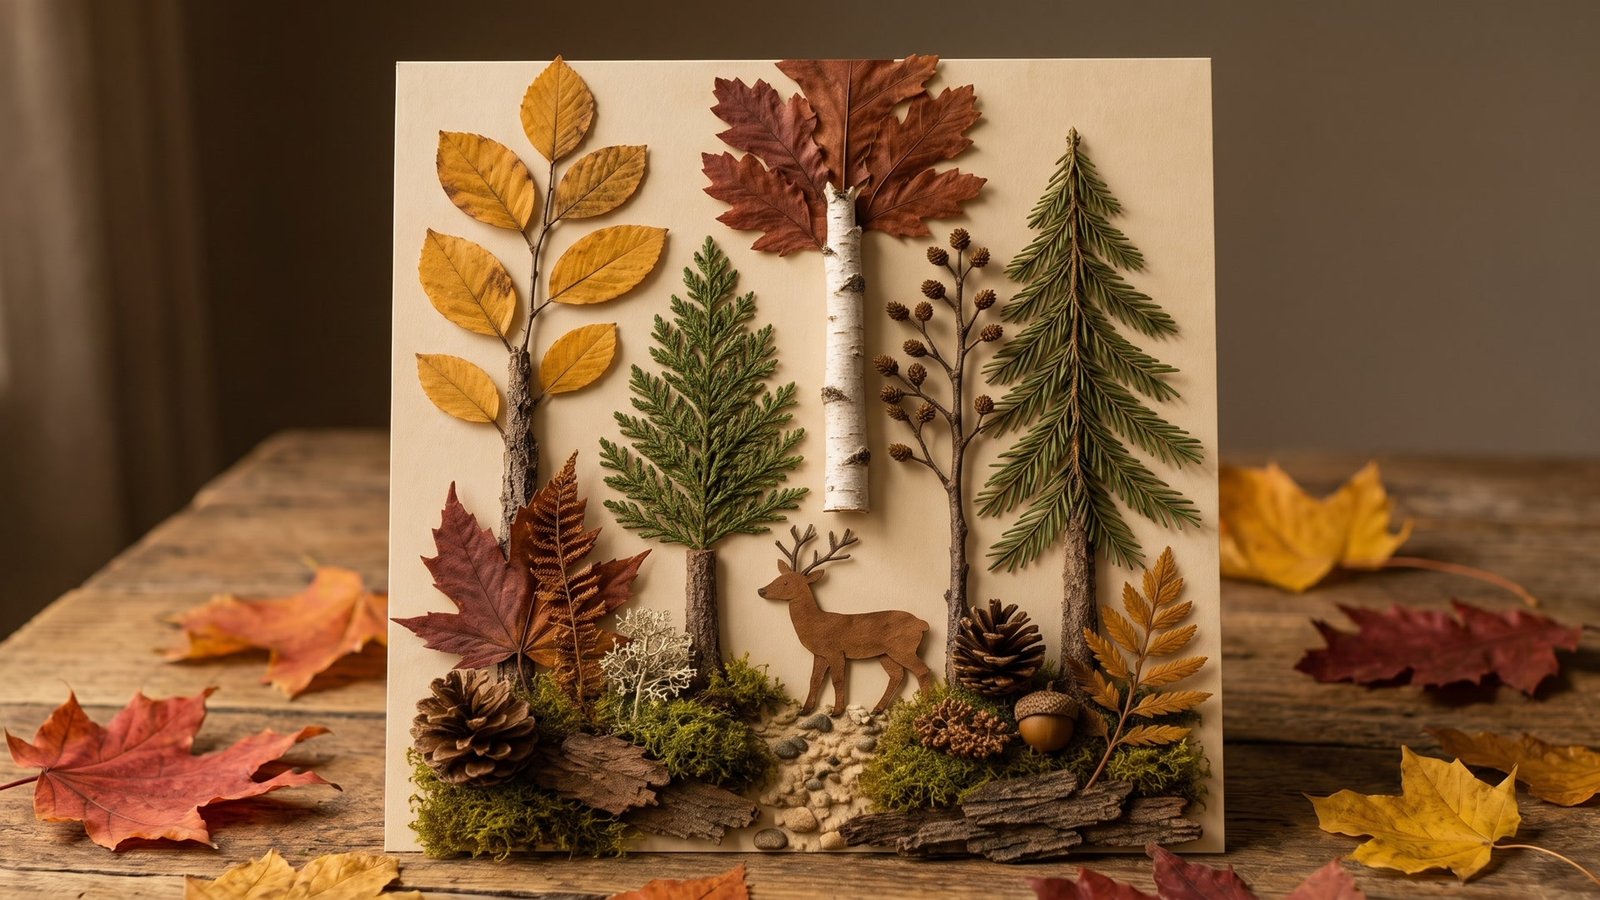
Every fall, the same thing happens on walks. Somebody fills their pockets with acorns, pinecones and the reddest leaves they can find, and then it all sits in a bowl on the counter until it crumbles.
I get it. Those little treasures feel too pretty to throw away, but you’re not sure what to actually do with them.
So here’s the good news. Almost everything you pick up on a fall walk can turn into something cozy for your home. Leaves, twigs, bark, moss, seeds, stones, they all work.
These crafts don’t need fancy supplies either. Most of them are just nature, some glue, a bit of cardboard and maybe crayons or paint.
I’ve split them into four groups. Little woodland scenes, nature wall art, cozy table pieces, and simple leaf art that’s perfect for kids.
You don’t need to make all twenty, of course. Grab a basket, go for a walk, and see which idea matches what you find.
Before You Start: Gathering and Prepping Your Nature Finds
Pick up things that have already fallen. Leaves on the ground, loose pinecones, dropped acorns and twigs are perfect, and you don’t need to pull anything off a living tree.
Check the rules if you’re in a park or nature reserve. A lot of parks don’t allow you to take stones, moss or plants, so collect from your own yard or a friend’s garden when you can.
Bugs love to hide in pinecones and acorns. Many crafters bake them on a foil-lined tray at a low temperature, around 200°F (95°C), for about 30 minutes, or freeze them for a couple of days, and either way it gets rid of any tiny guests.
If you bake them, stay close to the oven. Pinecone sap can catch fire if it gets too hot, so keep the temperature low and don’t walk away.
For pressed leaves, lay them flat between sheets of paper inside a heavy book. Stack more books on top and wait about a week or two, and they’ll come out flat and ready to use.
Little Woodland Scenes and Displays
1. Woodland Mini Scene With a Deer
This one feels like a tiny walk through the forest. Leaf trees, pinecones, moss and a little deer standing in the middle, all on one board.
Start with a sturdy piece of cardboard as your base. Glue bark, moss and small twigs along the bottom so it looks like a forest floor.
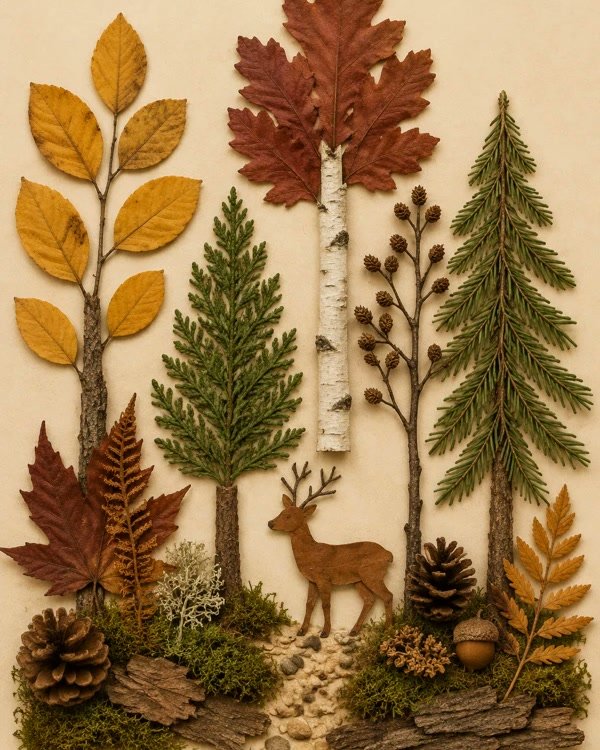
Then build trees from leaves and twigs stacked upward, like in the photo. Tall leaves on a stick make a simple tree, and pine needle clusters look like little evergreens.
Cut a deer shape from brown cardboard or card stock and glue it near the center. That little deer makes the whole scene feel like a story.
Let it lie flat for a full day while the glue dries. If you stand it up too early, the heavier pieces slide right off.
2. Woodland Mushroom Cluster on Bark
Mushrooms are so cozy and so fall. This little cluster on a piece of bark looks like a tiny corner of the forest floor.
Find a flat piece of bark or a thin slice of wood for the base. Then glue on some dried moss, small pinecones and a few sprigs of evergreen to make the ground.
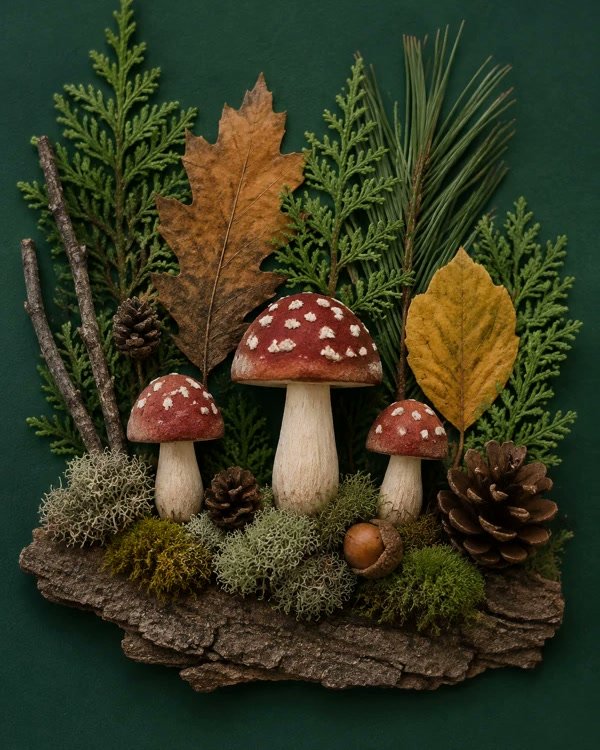
For the mushrooms, you can shape caps and stems from air-dry clay and paint them red with white dots. Or use acorn caps on little wooden pegs for a more natural look.
Make the mushrooms different heights, like a family. Three or five usually looks more natural than two or four.
Please don’t use wild mushrooms you’ve picked. Some are toxic to touch or have kids handle, so stick to clay or wood ones.
3. Acorn Color Wheel Tray
This is the easiest craft on the list, and kids love it. You just sort acorns by color and fill a sectioned tray.
Gather acorns in different shades. Dark brown, light tan, green ones that haven’t ripened yet, and even reddish ones.
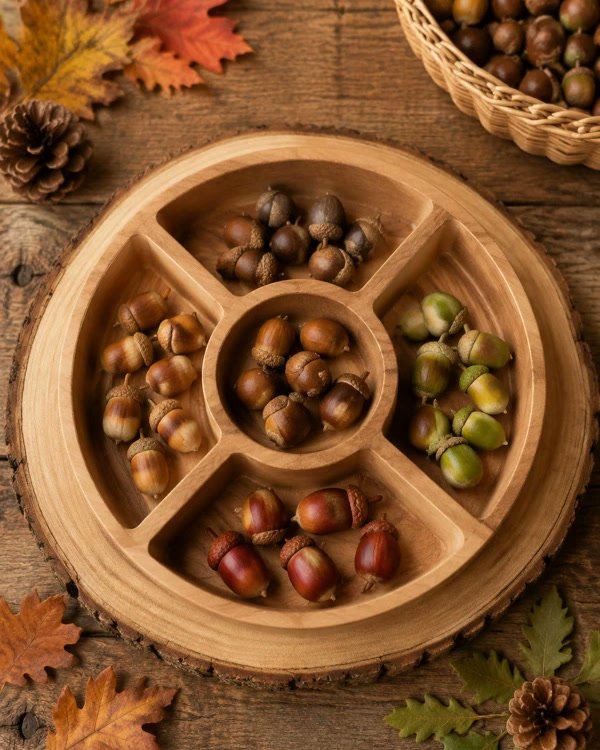
Wipe a round wooden tray with compartments and let it dry. Then let the kids sort the acorns by color, one shade in each section, with the darkest in the middle.
It’s honestly a lovely little sorting game for younger kids. They practice colors and counting without even noticing.
Bake or freeze the acorns first, like I mentioned above. Otherwise you might find little worms crawling out of the tray a week later.
4. Woodland Shadow Box With a Tiny Autumn Scene
A shadow box is like a little stage for your nature finds. This one has moss, a tiny owl, a little wooden bridge and a red mushroom, and it looks magical.
Use a cardboard box or a store-bought shadow box. Line the bottom and back with moss so it looks like a soft forest floor.
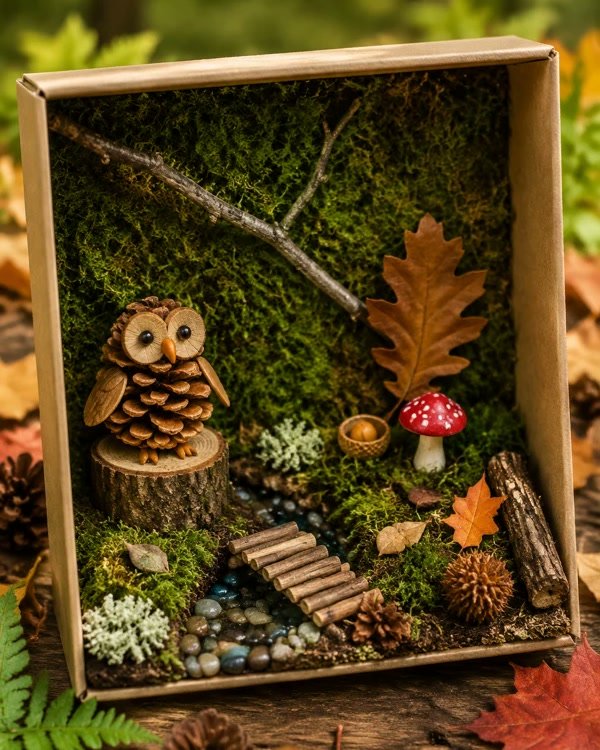
Glue in a small wood slice, a few twigs and some bark to build the scene. Then add little details like pebbles for a path, a pinecone owl and a small mushroom.
A pinecone owl is really simple. Glue two acorn caps on a small pinecone for eyes, and it suddenly has a face.
Build it lying on its back, then stand it up once everything’s dry. Gravity is not your friend while hot glue is still warm.
5. Wooden Tray Collage With Gathered Autumn Treasures
This is basically a little nature museum. A wooden tray with lots of compartments, each one holding a different treasure from your walk.
Find a divided wooden tray, like an old printer’s tray or a craft store box. Then gather a mix of pressed leaves, pinecones, acorns, twigs, stones and grasses.
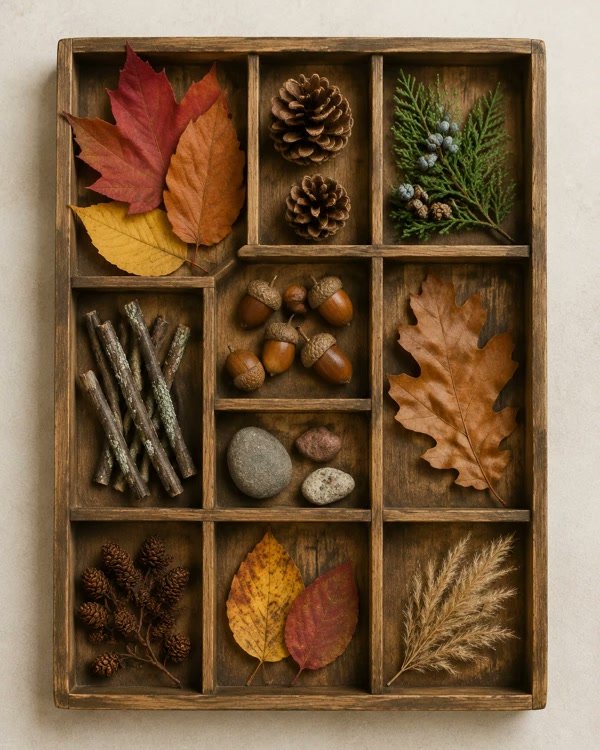
Put one type of thing in each section. Leaves in one, pinecones in another, a bundle of twigs, a few smooth stones, and some feathery grass.
Glue the bigger items in first, then fill the gaps. Set it on a shelf or an entryway table and it looks really thoughtful.
Let kids label each section on a tiny paper tag if they want. It turns a pretty display into a fun little nature lesson.
Nature Wall Art and Woodland Animals
6. Feathered Owl Wall Art With a Woodland Branch
This owl is so pretty, with layers of soft feathers and big round eyes. It’s sitting on a real branch, which makes it look like it just landed there.
Draw a simple owl shape on a piece of card or cardboard. Then glue feathers on in layers, starting from the bottom and working up so they overlap.
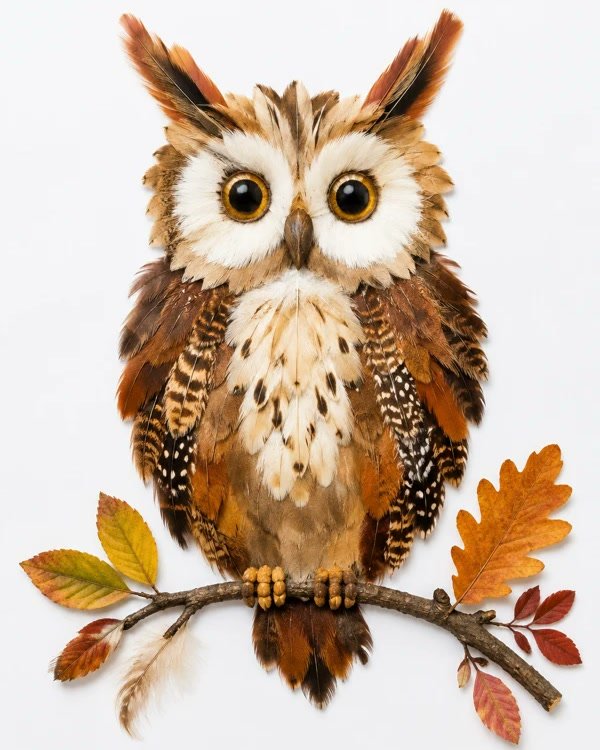
Add two big circles for eyes, a small triangle beak and two little feather tufts on top for ears. Then glue a real twig across the bottom for it to sit on.
Tuck a few fall leaves around the branch to finish it off. It looks lovely framed or hung on a bedroom wall.
Buy craft feathers instead of picking up wild ones. In many places, it’s actually against the law to keep feathers from wild native birds, and craft feathers are cleaner anyway.
7. Twisted Branch Tree With Autumn Leaves
This tree is made of real twigs and leaves, and it looks amazing on a plain board. It’s like a fall tree you can hang on your wall.
Arrange a few thicker sticks for the trunk and thinner ones for branches on a sheet of heavy card or a board. Glue them down so the trunk splits into branches.
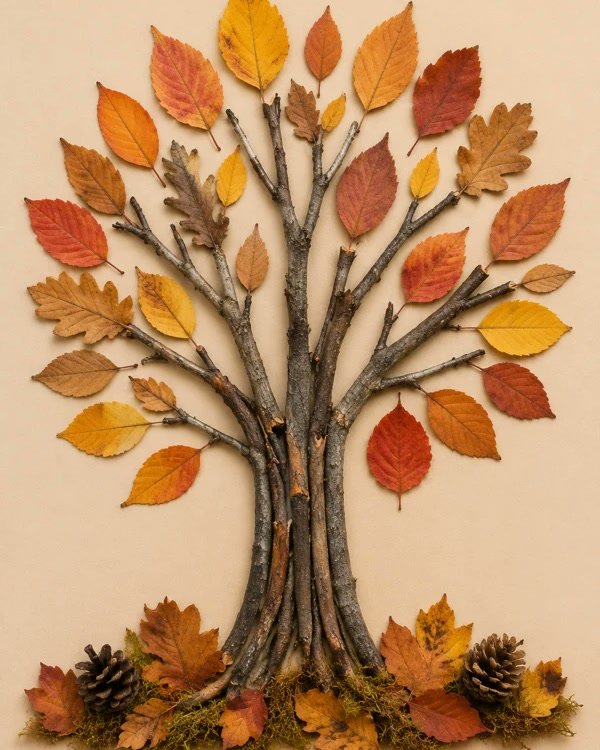
Then glue colorful leaves around the branches to make a full, round canopy. Mix oranges, yellows and reds for that classic fall look.
Add moss, a couple of pinecones and loose leaves at the base. It makes the tree look like it’s really growing out of the ground.
Real leaves fade and crack after a few weeks. Brush them with a thin coat of decoupage glue if you want the colors to last longer.
8. Rustic Twig Frame With Pressed Leaves
A twig frame looks so rustic and cozy. Put pressed leaves inside, or even a family photo, and it’s a sweet fall decoration for a shelf.
Start with a cheap picture frame or a frame cut from cardboard. Break twigs to the right length and glue them all around the edges, side by side.
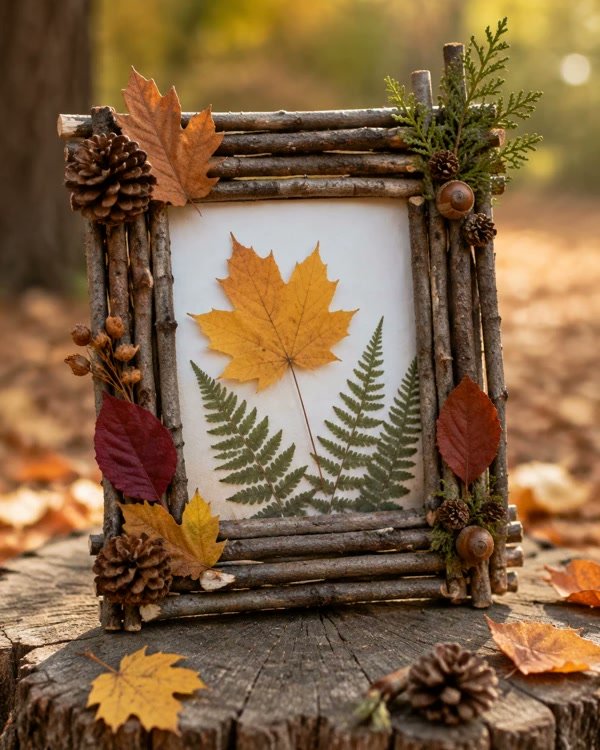
Arrange pressed leaves and a fern in the center, like in the photo. Then glue little pinecones, acorns and seed pods in the corners for extra texture.
Try to pick twigs that are about the same thickness. It just looks neater and they sit flatter against the frame.
Use hot glue for the twigs if an adult is helping. Craft glue works too, but it takes much longer and twigs can roll off while it dries.
9. Seed Mosaic Squirrel With Autumn Acorns
This seed squirrel looks like a lot of work, but it’s really just patience. Lots of little seeds glued in rows to make a fluffy squirrel.
Draw a squirrel shape on kraft paper or cardboard. Mark the body, tail, ears and belly so you know where each color goes.
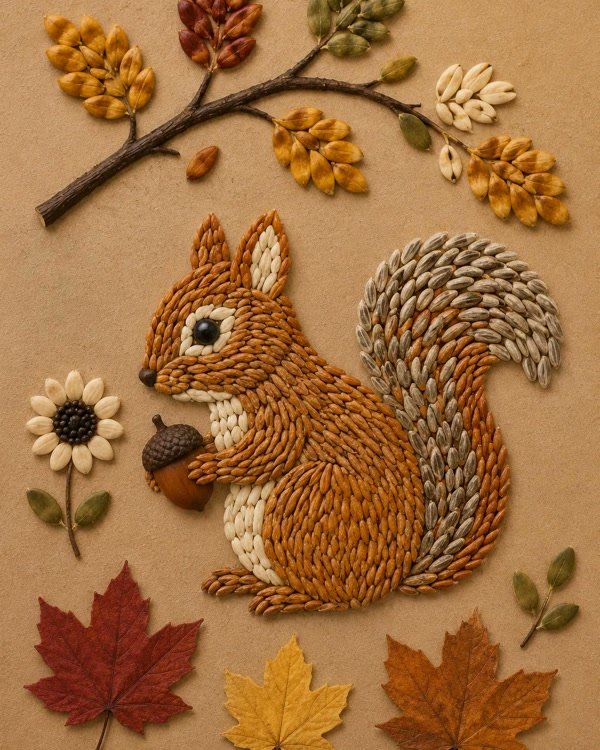
Fill each section with a different seed. Sunflower seeds for the tail, lentils or split peas for the body, and pale seeds for the belly.
Work in small areas, spreading glue a bit at a time. If you cover the whole squirrel in glue at once, it dries before you’re done.
Keep this one away from pets and little kids who might try to eat the seeds. And hang it indoors, because birds and squirrels outside will definitely try.
10. Leaf and Twig Tree on a Natural Stone Base
This little tree is built right on top of a flat stone. It’s small, simple and so sweet on a windowsill or desk.
Find a smooth flat stone and wash it well. Then glue a few small twigs on it in the shape of a tree trunk with branches.
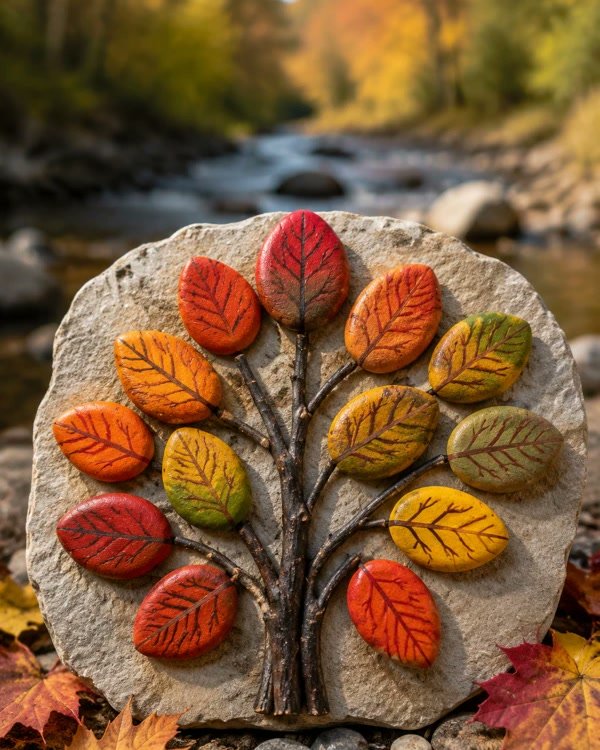
Once the twigs are dry, glue small colorful leaves around the branches. Little pressed leaves work best, because big ones cover up the tree shape.
You could also paint the leaves right on the stone if you don’t have small enough real ones. It’s a nice option for kids who love painting.
Strong glue matters here. Stone is smooth, so school glue just won’t hold, and a clear craft glue or hot glue works much better.
Cozy Pieces for Your Table and Home
11. Bright Painted Pinecone Ornaments
Plain brown pinecones are nice, but painted ones are so cheerful. Bright pink, teal, orange and purple tips make a fun pop of color.
Clean your pinecones and let them dry completely. Then paint just the tips of the scales with acrylic paint, leaving the inside brown.
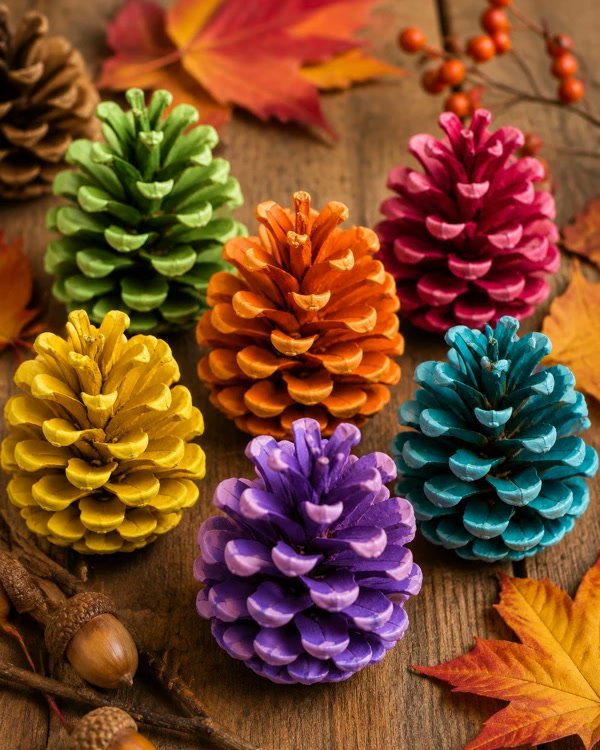
Let them dry standing up on wax paper or in an egg carton. Then spray them with a clear sealer if you want extra shine.
Pile them in a wooden bowl or scatter them down the table. You can also tie a ribbon on top and hang them as ornaments.
A dry brush works best here. Too much paint fills the gaps and the pinecone loses its pretty shape.
12. Natural Woven Coaster
This woven coaster looks so rustic and handmade. It’s made from dried pine needles or grasses coiled around in a spiral.
Gather long pine needles or thin dry grass and soak them in warm water for a bit so they bend without snapping. Bundle a few together like a thin rope.
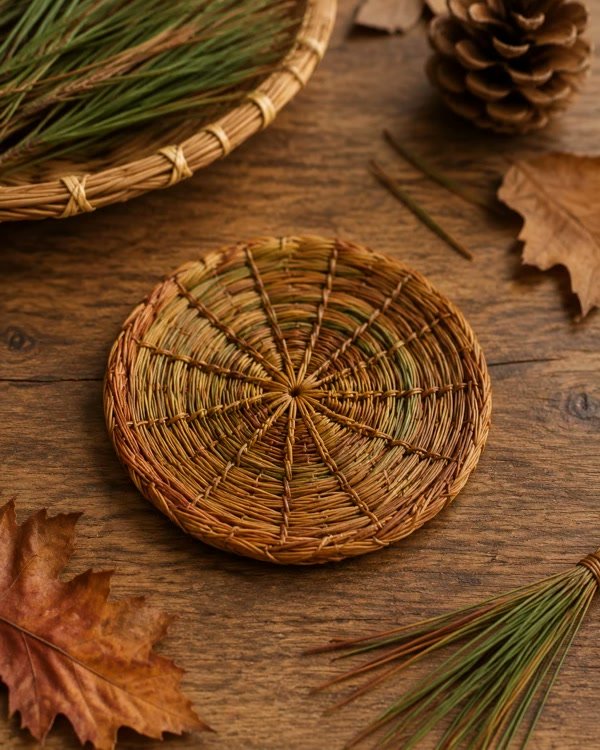
Coil the bundle into a spiral, starting from the center. Glue or stitch it as you go, working outward until it’s coaster size.
Tuck the end in neatly and let it dry flat under a heavy book. Then it’s ready for your morning coffee.
Fair warning, this one takes a while. It’s a nice calm project for an evening, but it’s not a quick ten-minute craft.
13. Leaf Imprint Clay Keepsake
Leaf prints in clay look so delicate and calm. You get every little vein of the leaf pressed into the clay forever.
Roll out air-dry clay into a smooth circle or oval. Then lay a leaf on top, vein side down, and press it in firmly with a rolling pin.
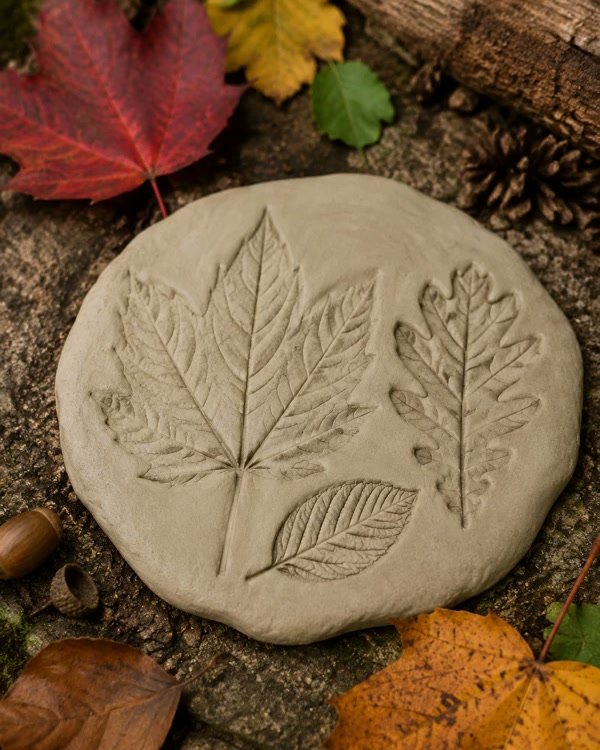
Peel the leaf away slowly and you’ll see the print. Try a few different leaf shapes on the same piece for a pretty pattern.
Let it dry for a day or two, turning it over halfway so it doesn’t curl. Leave it plain or brush on a little watercolor for a soft touch.
Leaves with thick, raised veins give the best prints. Soft, thin leaves often don’t leave much of a mark.
14. Maple Leaf Crown
Kids go crazy for leaf crowns. It’s like being the king or queen of the forest for a day, and it makes the sweetest fall photos.
Cut a strip of thick card long enough to go around your kid’s head, or use a plain headband. Then gather a pile of colorful maple leaves.
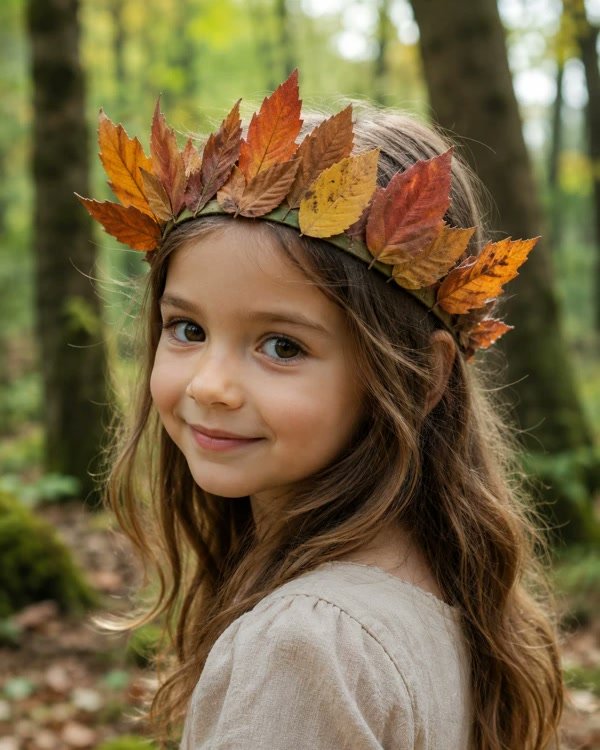
Glue the leaves around the band, overlapping them so they point up like a crown. Mix reds, oranges and yellows all the way around.
Let the glue dry fully before anyone wears it. Then head outside for photos while the leaves are still bright.
Fresh leaves dry out and curl in a day or two. If you want it to last longer, use pressed leaves, or keep the crown just for that one fun afternoon.
15. Balanced Stone Figure With Autumn Leaf Accents
This little stone figure looks so calm and peaceful. It’s just smooth stones stacked into a person, with a few bright leaves for arms and a crown.
Sort your stones from biggest to smallest. Start with a wide flat one at the bottom, then stack the others up into a body and a head.
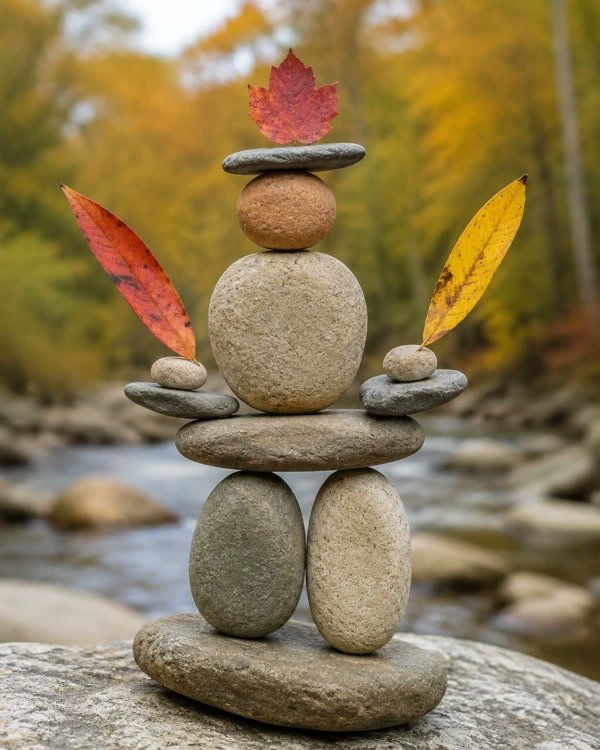
Glue small pebbles on the sides for arms. Then add a red leaf on top and two yellow leaves at the sides like the photo.
Use strong craft glue or an outdoor glue between every stone, and let each layer dry before adding the next. A wobbly stack falls over at the worst moment.
Collect your stones from your own garden or buy a bag of river rocks. Taking stones from rivers and parks can disturb little creatures that live under them.
Simple Leaf Art Kids Will Love
16. Crayon Leaf Tree Art
This is a nice drawing craft that still feels connected to nature. You draw a big tree trunk and fill it with leaf shapes in warm colors.
Use a sheet of kraft paper or brown card stock. Draw a tall trunk with a brown crayon, pressing hard and adding lines for bark texture.
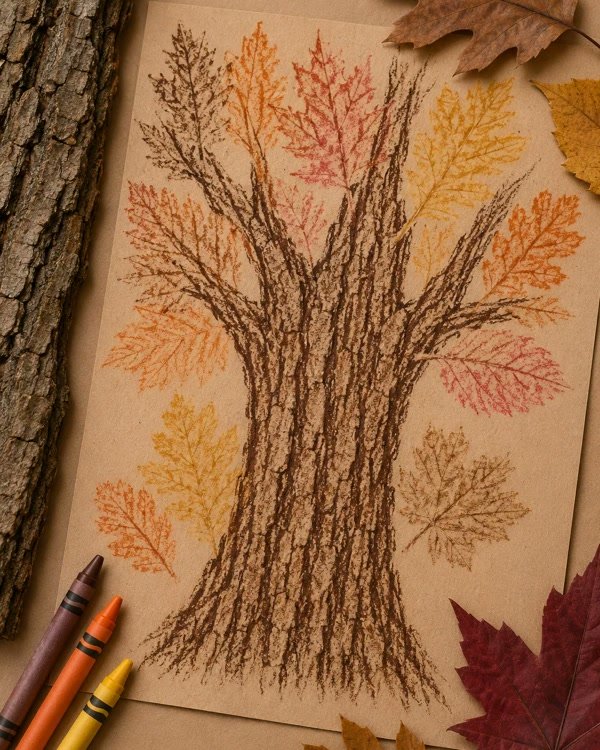
Then draw lots of leaves around the branches in orange, yellow and red. Keep a real leaf next to you so kids can look at the shape.
Tape the paper to the table while you draw. It stops the page from sliding around and the lines come out much neater.
Oil pastels work too, and they’re even brighter. Just keep wet wipes handy because they get on everyone’s fingers.
17. Pressed Leaf Suncatcher
A leaf suncatcher glows so beautifully when the light comes through. Hang it in a window and it looks like stained glass made by nature.
Cut a ring from cardboard, like a big circle with the middle cut out. Stick a sheet of clear contact paper on the back, sticky side facing up through the hole.
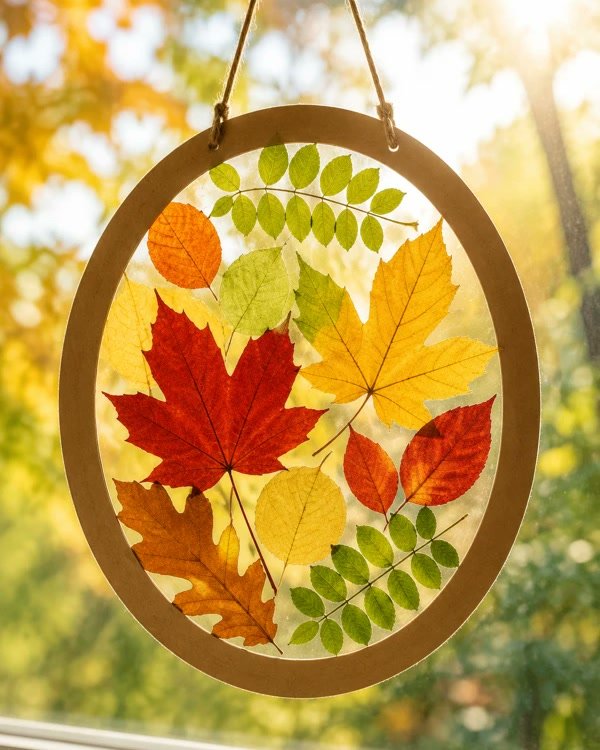
Press your pressed leaves onto the sticky part in a pretty pattern. Mix colors and shapes so the light shines through lots of different tones.
Seal it with a second sheet of contact paper and trim the edges. Then tie on a bit of twine and hang it in a sunny window.
Use flat, pressed leaves for this one. Fresh leaves trap moisture under the plastic and can go brown and moldy.
18. Painted Leaf Prints
Leaf printing is such a fun, slightly messy craft. Paint a leaf, press it on paper, and you get a perfect print of its shape and veins.
Brush a thin layer of paint on the bumpy, veiny side of a leaf. Then press it paint-side down onto white paper and rub gently over it.
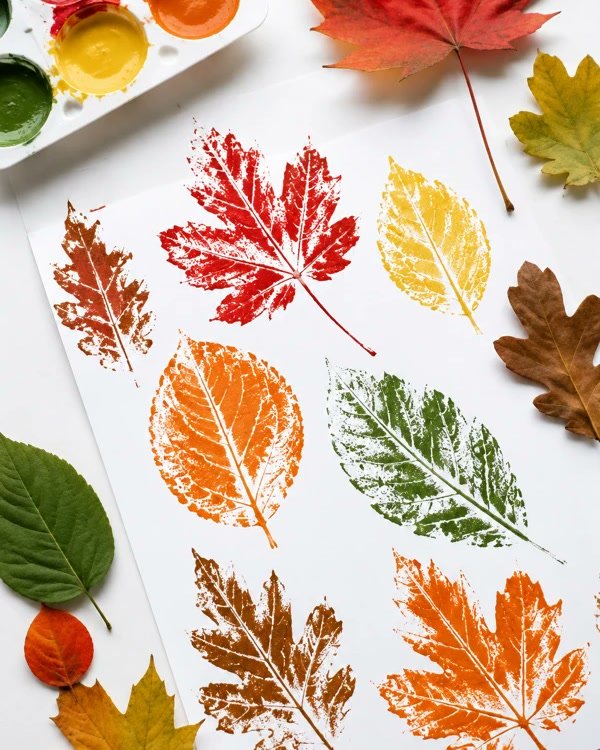
Lift it slowly and there’s your print. Try different leaves and colors until the whole page is full, like the photo.
The trick is using a thin coat of paint. Too much paint fills in all the little veins and you just get a blob shape.
Put down newspaper first. Leaves with paint on them have a way of ending up everywhere except the paper.
19. Leaf Crayon Rubbings
Leaf rubbings are a classic for a reason. Kids are always amazed when the leaf pattern magically appears on the paper.
Put a leaf under a sheet of white paper, vein side up. Then rub the side of a peeled crayon over the paper until the leaf shows through.
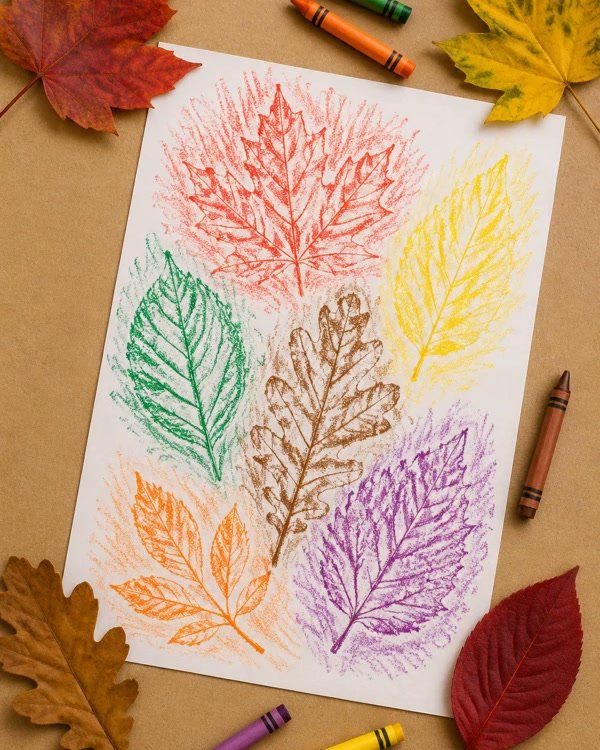
Use a different color for each leaf to make the page bright and cheerful. You can fill a whole sheet, like the one in the photo.
Peel the paper off the crayons first. It’s so much easier to rub with the side of a crayon than the tip.
Thin, dry leaves can tear when you rub too hard. Fresh leaves with strong veins work best, so pick those up on your walk.
20. Radiant Leaf Mandala
A leaf mandala is so calming to make. You arrange leaves in circles around a center, and it turns into a beautiful round pattern.
Sort your leaves by color and size first. Small green ones, then yellow, orange, red and brown, getting bigger as you go out.
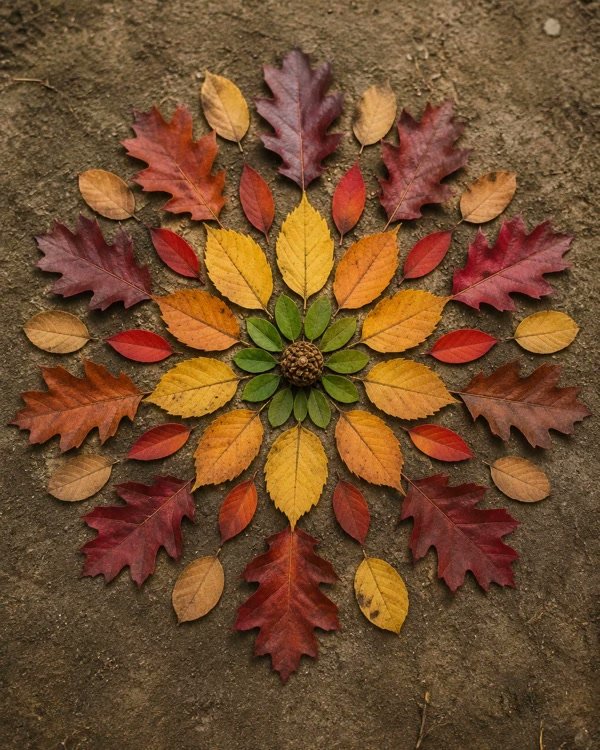
Put a pinecone or acorn in the center. Then lay the smallest leaves around it in a ring, and keep adding rings outward.
You can make it right on the ground outside and just take a photo. Or glue it onto cardboard if you want to keep it.
It’s okay if the rings aren’t perfect. Nature mandalas look best when they’re a little wild and uneven.
That’s pretty much the list
Twenty fall nature crafts, and you only need a basket and a walk to get started. Seriously, just pick one or two.
If you have little kids, start with leaf rubbings or the acorn sorting tray. For something to keep, try the twig frame or the leaf imprint clay. And if you want a showpiece, go for the woodland shadow box.
The best part is that every craft looks a little different, because every walk gives you different treasures.
So what are you going to collect on your next walk?